Saturday, May 30, 2015

Saturday at the Quilt Museum - Friendship Quilts

Traditional Signature Friendship Quilts

In our quilt group, Friendship Quilts are something that have been going on for 2 decades.  Having joined only a few years ago, I've only had the pleasure of participating in a few.

Obviously they have been a wonderful part of quilting communities for centuries.

What I didn't know is that there are two distinct kinds of what we today call "Friendship Quilts."

The classification of these labors of love is actually "Signature (or Autograph) Quilts" and is broken into two categories. An article on Womenfolk.com talks about them:

"There are two distinct kinds of autograph quilts.  Single pattern quilts are often referred to as "friendship quilts" while the more formal quilts made of different blocks are called "sampler album quilts.""

I've come across a few of both kinds recently as I've perused Pinterest.
The first would be considered a sampler album quilt.

Isn't this an amazing beauty?

Made for Mary Ella Deacon 1841-1842

It is entitled simply "Made for Ella Maria Deacon" (1811-1894)

Can you IMAGINE being the recipient of this??

It was made in 1841 & 1842 in Mount Holly, New Jersey, which would have made Ella Maria 31 years old.  I wonder who she was and what it was about her that inspired all these people to lovingly make such a treasure?

There are 85 blocks, all of which have either a person's name associated with them, or a poem written on them.  Some of them have men's names, which interests me greatly.

They are either pieced or appliqued, some with broderie perse, and to me it looks as if someone coordinated the effort, because the color play is just wonderful.

It appears to be in immaculate condition, which speaks volumes of the value this was to the recipient and following generations.

You can read more about it at the Art Institute Chicago.

The list of names of the people involved represent families and individuals.
Wouldn't it be fun to know their stories?

* * * * * * * * *

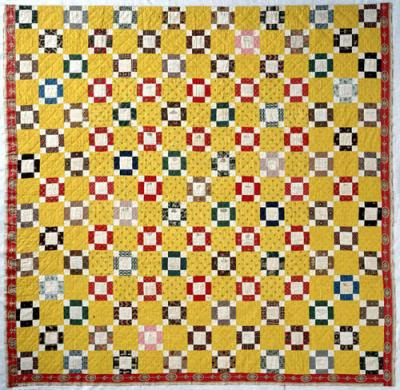
These two would be considered friendship quilts because the blocks are all the same.

How amazing is this?!?

Turkey Red Fleur de Lis, Pennsylvania, 1850

Turkey Red Fleur de Lis made in Pennsylvania, circa 1850.

Someone had to have coordinated this one, as well, as the block/fabric placement is perfect.

Unfortunately, I don't have any more information about it than that.


This is a classic signature album quilt made in 1843.

Sweet Sister Emma, 1843, Darby, Pennsylvania

It is dubbed "Sweet Sister Emma"

It was made by Martha Knowles for her sister Emma Sheppard,
and consists of 64 inscribed blocks.
Most have signatures and Bible verses.

You can read more about it at The Quilt Index.

So, are you inspired to make a Friendship Quilt for someone? Or hope that your quilt group will take up the tradition of making them for each member in turn, as ours has? Such treasures!

Happy Quilting!

PLEASE NOTE:
- I am not a quilt historian.  I simply enjoy finding interesting quilts and sharing them with you!
- The quilt images on this post were sourced from Pinterest unless otherwise noted, and are linked to their origin whenever possible.

Thursday, May 28, 2015

Appliqué Tutorial - Part 2 - Bias Tape

See Part 1 - Shapes

Continuing our Appliqué tutorial!

When I have stems to make for any applique piece, I use Clover's bias tape makers.  They take the mess out of the process, and I actually like making it!

What you'll need to get started:
A dry iron
Best Press
Clover Bias Tape Maker in whatever size you want to make
(The 3/8" size is made for use with fusible web, but is used in basically the same way, with or without the fusible web.)
Straight pin
Fabric of choice
Flour sack dish towel to cover your pressing surface

What you'll need to get started

This is what the bias tape maker looks like:

Side
This is what the bias tape maker looks like


Large end for feeding the fabric
This is what the bias tape maker looks like - large end

Small end where the bias exits
This is what the bias tape maker looks like - small end


Step 1:
On the bias of your fabric, cut strips twice the size of the bias tape
you want to make.

On the bias, cut strips twice the size of the bias tape you want to make.


I made 1/4" in this example, so I cut the fabric 1/2" wide

I made 1/4" in this example, so I cut the fabric 1/2" wide


Step 2:
Spray the fabric with Best Press.  It should be wet but you don't want puddles!

Spray the fabric with Best Press

Step 3:
Start feeding the fabric into the large end of the bias tape maker, wrong side up.

Start feeding the fabric into the large end of the bias tape maker, wrong side up

Step 4:
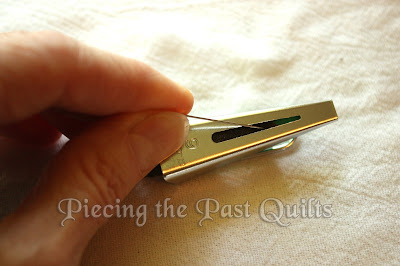
Turn the bias tape maker over.  You'll see the end of the fabric
in the little window.

Take your straight pin and push the fabric toward the small end
until it exits the tube.

Take your straight pin and push the fabric toward the small end until it exits the tube.

It will look like this:

It will look like this:


Step 5:
Turn the bias tape maker over again and let it sit flat
on your covered ironing surface.

Place the tip of your dry iron against the small end
of the bias tape maker as shown.

Hold the handle with your left hand and then push the iron to the left.

The bias tape maker will glide over the pressing surface
feeding the bias fabric as it goes.

Guide the bias tape maker, keeping the fabric feeding straight,
as you push the iron.

Guide the bias tape maker, keeping the fabric feeding straight, as you push the iron.


If you move the iron off, this is what you'll see.

If you move the iron off, this is what you'll see.


Just keep going until you reach the end of your bias strip.
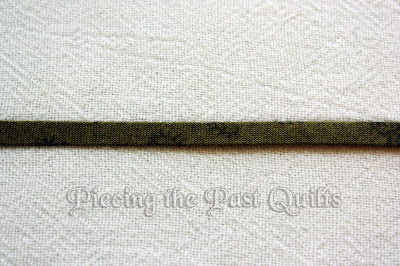
This is what it will look like, wrong and right sides.

This is what it will look like, wrong and right sides.

This is what it will look like, wrong and right sides.


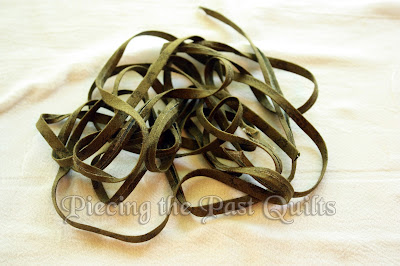
Voila!  A beautiful pile of vines or stems!

Voila!  A beautiful pile of vines or stems!


This concludes Part 2 of "Perfect" Applique - Bias Binding, The Tutorial


Look for Part 3 soon.

Happy Quilting!!

This post was first seen on the "Piecing the Past Quilts" Blog.

Saturday, May 16, 2015

Applique Tutorial - Part 1

My Applique History - Skip this if you just want to get to the tutorial!

Applique and I have been in a merry war for years.  I tried it a number of times, and inevitably I ended up tense and going to pieces.  It was no fun and I finally decided I just wasn't going to mess with it anymore.

However.......I belong to a quilt group in which there are many amazing applique artists, and they kept encouraging me to try again.  I kept saying, "Thank you, but no."

Well, eventually I ended up deciding that I needed to slay this giant, so signed up for an introductory applique class.  It was okay, but nothing super special.  I came away with an understanding of which thread I'd like to use, a handy way to make bias tape for stems, and an assurance that my stitching was fine.  I also came away with the confirmed knowledge that I still greatly disliked needle-turn. Period.

Shortly thereafter, a free block of the month project came up on PickleDish.com for a World War I commemorative quilt.  My grandfather served in the Great War and I thought it would be a good quilt to make and try to use his uniform buttons on it somehow.  So I started in with the knowledge that I would have to conquer 34 leaves and as many inches of stem on each block.  I knew how to do the stems now, but the leaves.  Oh, how they made me quake!

A friend of mine had the same struggles, and she came up with an idea that solved the issue for both of us.  She made some "perfect" leaves from heat-resistant mylar along the same lines as Karen Kay Buckley's Perfect Circles.  Voila!! We were in business.

This is the result:


Ever since then, I've enjoyed applique.  I've branched out into other shapes as well, and when I design a pattern, or one strikes my fancy, I make sure the applique shapes can utilize the "perfect" method.  No sharp interior curves or angles, and I've got it made.


I realize that this method is limiting. Needle-turn is a creatively limitless method, but if it doesn't work for me, I'd rather do what does and be able to add those cute applique touches that make me happy.

Okay, now for the tutorial!!

Applique, Part 1 - The Tutorial

NOTE: It would be good to read through all the instructions before you start.
Some things that might be foggy at the beginning will be clearer the further you get into the tutorial.

You will need a few things to get yourself started:

Heat-resistant Mylar (I use both clear and opaque)
Karen Buckley's Perfect Circles (there are ovals, too)
Fine-tip Sharpie
Frixion Pen
Good sharp scissors
Needle and thread
Dry Iron
Best Press
Flour sack dishtowel
Pattern
Fabric


Step 1:
Trace your pattern pieces onto transparent Mylar using a fine-tip Sharpie.
It may be a little hard to see in the picture, but the Mylar is positioned over the flower and leaves in the middle of the picture.


Step 2:
Cut out your pieces using sharp scissors.
These are the shapes you will use to form your fabric.


Step 3:
Place your pattern shapes on another piece of Mylar (I like the white best for this step because it's heavier and thicker) and trace them using a fine-tip Sharpie.
Add 1/4" turning allowance to your tracing lines and cut out.
The larger shapes will be your templates for marking your fabric.


NOTE:
I make lots of the smaller shapes, but just one of the larger.
As you'll see farther on, the smaller shapes go inside the fabric.
You can get a bunch ready to go at once and save time at your pressing station.


NOTE:
I keep my bigs and littles in small zipper bags to keep them organized, and my Perfect Circles on the ring that comes with them.


Step 4:
NOTE: Make sure you click on this next series of pictures so you can see enlarged versions.

Using the larger size shapes you've made, trace around them on your fabric using a Frixion pen.
(The Frixion pen ink will disappear when ironed.)
If you are using Perfect Circles, use a circle 1/2" larger than your finished circle size so you have 1/4" turning allowance all around.


Step 5:
Cut out the shapes.
Good sharp scissors with a tiny serration are awesome for this.
I use Karen Buckley's Perfect Scissors.  The serration helps with minimizing fraying.


Step 6:
Using needle and thread, baste around each shape 1/8" from the edge.
No need to knot the thread.
Start and end your thread on the right side of the fabric as shown.


Step 7:
Place the Mylar shapes in the center of each fabric shape.
Pull both ends of the thread gently to bring the fabric up around the Mylar shape.
Continue to draw the threads across the shape and down, snugging the fabric around the shape.


Step 8:
Cover your pressing board with a flour sack dishtowel to protect it.
While holding the threads, spray the shape with Best Press.
Get it wet, but not totally soaked.
The wetness will relax the fabric.
If necessary, gently pull on the threads again to snug it up.
Using a dry iron set on medium-high, press on the wrong side first,
covering the shape with the iron.
Hold for about 10 seconds. Test the time for your iron.
The Mylar is heat resistant, but can buckle if it gets too hot.
Turn the shape over and do the same on the right side, making sure it is dry when finished.


This is what they'll look like.
The Best Press really makes a huge difference in keeping their shape.


Step 9:
Remove the Mylar shapes carefully.
Pat the edges down, but don't press again.  It can make nasty marks if you do.
Pull the threads across the shape and snip them.


Step 10:
Turn them over.
This is what they look like on the right side!!
Isn't that awesome?!?!


This is the end of Applique, Part 1, The Tutorial


How to make bias tape for perfect stems and vines.

This post was first seen on the Piecing the Past Quilts Blog.