Saturday, June 27, 2015

I Crossed Paths with a Feathered Star.....

Last month I had the pleasure of coming across an old quilt quite unexpectedly.

My friend Annie and I volunteer at the local Borst House once a month on tour days. We dress up in our period clothing and sit and quilt in the parlor of the home which was built in the early 1860's.  We talk with the visitors and tell them about the house and about quilting.  This is us last year.


It's really a wonderful house and has so much Lewis County History tied up in it.  You can read about it here if you'd like.

In May, another volunteer told us about a quilt  she had found on a bed upstairs underneath a 1930's Grandmother's Flower Garden quilt.  She said it looked older and wondered what we'd think about taking a look.

So we did.  This is what we found!

15 Feathered Star blocks alternating with 15 plain blocks,
bordered with triangles, and finished with cornerstones & partial blocks.
It appears to be from the mid-1800's.


Here are a couple of the blocks up close.
Such a treasury of fabric prints!


The border and cornerstones.


This quilt got me interested in trying to draft a feathered star.  When I attempted to find a pattern to give me an idea of ratios, I discovered that the modern feathered stars have a diamond at the point of each star tip while the older ones have triangles.  Hmmmm....... Looking through pictures of both antique and modern quilts, I now notice the difference.  And neither type of pattern is easy to draft!

One of these days I'll be sharing a collection of Feathered Star quilts on a "Saturday at the Quilt Museum" post.  There are so many beautiful ones from antiquity!

Happy Quilting!


Wednesday, June 24, 2015

Product Review: Our Favorite Piecing Notions and Tools

With the Block of the Week ready to start next Wednesday (!!!), I thought it would be fun to share with you our favorite notions and tools for piecing.

Accurate piecing depends on several elements in the process:

1. Accurate and Consistent Cutting


Our favorite rulers and rotary cutters are Creative Grids and Martelli, respectively, and we keep looking for the perfect mat!

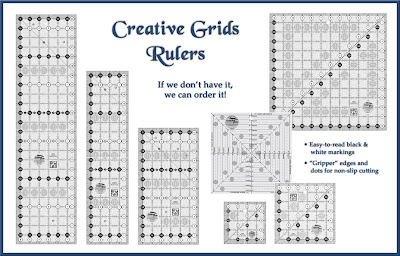
Creative Grids Rulers

I was recently introduced to Creative Grids Rulers by a friend of mine.  My first reaction when using one was the quintessential, "Where have you been all my quilting life??!!"


Creative Grids Rulers

The high points for me are:

  • They grip the fabric and don't move when rotary cutting.  Seriously.
  • The markings are clear and easy to read (less "busy").
  • 1/4" from the edge, there is a continuous dashed line on two sides that works beautifully for marking or adding seam allowances.
They're made of clear acrylic and are marked only in black and white. They have 1/4" "gripper" edges on all sides and circles in the interior areas that seriously keep the rulers from moving when cutting.  More accurate cuts and less possibility of cutting fingers!

For small blocks, such as we'll be doing in the Block of the Week project, I love the Itty Bitty Eights 3" x 7" ruler.  The eighth-inch markings are really helpful and aid in amping up cutting accuracy.


Martelli Rotary Cutter

When I first saw this, I wondered if it would really be as good as it is billed.  It is. 
It's ergonomic and my hand just doesn't tire even when I have lots to cut.  Which is often.  It fits in my hand naturally and it's held similarly to holding a computer mouse.  There's no bent wrist, and the motion is fluid.  It has a blade guard and easy-to-change blades.  I like it!

They come in both right- and left-hand models.


Cutting Mats

We have tried a number of mats, hoping that there would be one that would last us a long time.  Still looking!  But then again, we use ours multiple times everyday.

These are two that have been better than the others:


Elan 

These are made in three layers and are thicker than any I've ever used.  And they're reversible.  One cutting side has markings and the other doesn't, with a cushion layer sandwiched in between which makes cutting amazing and protects your rotary blade. These are also self-healing.


Sullivan 

These are high-quality self-healing mats.  They are double-sided, and have clear, simple grid markings on both front and back, which doubles the life of the mat. One side is red, the other is gold, which makes it possible to use the side that works best with your fabric colors.  And on a purely esthetic note, we like the red way better than the museum green of many of the other mats!


2. Accurate Pinning


Clover Patchwork Pins

When we found these pins, we were ecstatic!  They are amazing.  A friend of ours, after using these for the first time, said that regular quilter's pins feel like spikes!  They are so smooth and fine that pinning anything is a breeze.

In using them for piecing, because they are so thin and fine, they minimize the distortion of the fabric and the seams, thereby increasing accuracy.  There are no huge bumps to navigate at the pin entry and exit locations.  They also have heat-resistant glass heads, so they can be ironed. We love them!


3. Accurate Sewing


Schmetz Machine Piecing and Quilting Needles

These are needles designed specifically for machine piecing and quilting!
They are made with a special taper that ends in a slightly rounded point, and are designed for easier fabric penetration and the elimination of skipped stitches.  After I started using them, I had this feeling of, "Oh, there was no stress in doing that bit of difficult piecing."  It just went much smoother.  The size is 11/75.

If you'd like to compare needles, you can check out a cool Schmetz Needle Guide here.


4. Accurate Clipping & Trimming

Scissors

I do a lot of clipping on the backs of my blocks. I'll do a tutorial someday on clipping tricks, but for now, the most important thing to know is that sharp scissors with a good point are essential.  There are none better in my experience than Karen Kay Buckley's Perfect Scissors.  I use the small and medium sizes daily.  They have tiny serrations on the blades, helping to keep cuts from fraying.  The best ever!


Block Trimming

All the same information as in number 1!

5. And a Bonus! - Protective Storage

Project Bags

After I'm finished with my blocks, I store them in theses wonderful project bags.  Not only do they protect the blocks, they allow direct sight to what's in them.

They are heavy-weight clear vinyl with a sturdy zipper.  They come in three sizes: 17" x 17", 10" x 13", and 5" x 8".


* * * * * * * * * * *

Click the button below to look at notions on our website!


* * * * * * * * * * *

Sign up for our Newsletter to make sure you get our
Weekly News and Specials!


Happy Quilting!!


Saturday, June 20, 2015

Saturday at the Quilt Museum - 19th Century Medallion Quilts - Part 1

My introduction to medallion quilts is relatively recent.  I have friends who are amazingly talented in making these beauties in the 19th Century English tradition.  So I started "collecting" them, in pictures!

The thing that is captivating me in this genre is the use of so many beautiful techniques.  Piecing, applique, broderie perse, and English paper piecing are all utilized in these lovely quilts.

Let's take a tour of some of those I have found.  I'm starting with English quilts.  We'll look at those made in America next time.

* * * * * * * * * * *
Mrs. Billings' Coverlet
1805 - 1810
Leeds
84.5" x 84.5"


Amazing! This intricately pieced quilt is made up of fifteen frames of varying shapes. Included are hexagons, squares-on-point, diamonds, and triangles. The piecing is absolutely stellar!

Fabrics are printed cotton dress prints and some furnishing prints.

Mrs. Billings was a housekeeper in a large home. It makes me wonder how she accumulated all the fabric pieces for this and when and where she did her piecing.  I also wonder how long it took her to make it.  Such an incredible quilt.

It is housed at the Quilt Museum and Gallery in York.
You may read more about it and see it close up with their zoom feature here.

* * * * * * * * * * *
Mary Staveley Medallion Quilt
Dated 1833
East Yorkshire England
99" x 82.5"

The medallion in this quilt is embroidered in colored wools and was done when Mary was 12 years old!  The pattern is so graceful and well executed.

I simply love the look of it.  Blue is my favorite color, so that was an instant draw for me, but the framing feel from the alternating half-square triangles and squares is wonderful!  And it's fun to see what we would call a "border print" used here.

More can be read about the quilt here at Live Auctioneers.

* * * * * * * * * * *
1850 Mosaic Hexagon Quilt
England


I couldn't find much information about this quilt, other than it comes from England and was made circa 1850.  However, there are many good pictures of it on the Cactus Needle Blog.
So many hexagons!!

* * * * * * * * * * *
Frances Hawkins Medallion
Dated 1818
England
96" x 85"

This one is so amazing. Hexagons are used in many of the patterns, pieced 7-point stars (which appear to have been appliqued) join broderie perse applications and appliqued baskets around the central motif.  The pointed border pieces are artfully arranged.  Her name and the date appear to be made from hexagons, as well.  Just stunning!

Originally the information about this quilt came from International Quilt Study, but I can't bring it up in order to link to it.

The following accompanied the photo on Pinterest: IQSC 2006.035.0001. Purchase made possible through James Foundation Acquisition Fund - An Elegant Geometry: American and British Mosaic Patchwork Exhibition.

* * * * * * * * * * *
English Bedcover
1830 - 1840
122" x 113"

At the beginning of the nineteenth century, Britain was inundated with new printed cottons.  They made their way into the quilts of the day by way of the clothing and furnishings of the English people.

Printed panels were also popular.  This quilt is an example of a panel used as the center medallion and then framed 8 times with a variety of printed cotton, piecing and paper piecing, and perhaps some applique, as well.  I love that cornerstones are used in each frame, creating a consistency that draws the eye to the center.  I also like the flying geese that create a lovely motion around the quilt. Beautifully done!!

It resides at the Victoria and Albert Museum and there is lots of information here.  Keep clicking on the tabs.  So much history in this piece!

* * * * * * * * * * *
So, I'm actually getting inspired to make one of these.  I'm trying to decide if I should use one of Di Ford's patterns, or design my own.  It will probably be a combination of both!

Di's fabulous book, Primarily Quilts is loaded with amazing designs in the nineteenth century English styles that we've just seen.

She does a stunning job of creating interesting frames/borders which make her quilts beautifully timeless.

She combines piecing, applique, broderie perse and English paper piecing, just as we have observed in the above quilts.

The color photography is absolutely gorgeous, and the instructions are presented in both English and French.  And, wonderfully, the patterns are all full-sized!


Buy Primarily Quilts Button


Next trip to the "Museum" we'll be looking at American Medallion Quilts!

Happy Quilting!!

PLEASE NOTE:
- I am not a quilt historian.  I simply enjoy finding interesting quilts and sharing them with you!
- The quilt images on this post were sourced from Pinterest unless otherwise noted, and are linked to their origin whenever possible.

Wednesday, June 17, 2015

PRODUCT REVIEW: Quick and Easy Block Tool


Since we're going to be using this in our Block of the Week project, I thought maybe it'd be good to show you a bit about it!

Last year a friend of mine introduced me to this amazing tool, and I instantly knew I needed one myself and that we should stock them in the shop.  It makes projects like this so much easier!

Basically, it looks like a collection of bookmarks!  On both sides of each "bookmark" is a quilt block that has rotary cutting and piecing instructions for 5 different sizes for that block.  There are 102 of them!  Some blocks use 3", 6", 9", 12" & 15" sizes, and some use 4", 6", 8", 10", and 12" sizes, depending on the grid of each block.  Every pattern has 6" and 12" sizes, which makes it great for making sampler quilts!


At the front, there is a block index that lists every block in the collection alphabetically by name, and also gives it a number.


There is a section at the back that has a number of helpful charts that are useful for quilters, such as the "Corner Alignment for Piecing Shapes" shown here.


This is what an individual pattern looks like:

It has the completed block, a piecing diagram, and then the cutting sizes for every piece in each block size.  It's color coded and very clear.

For each Block of the Week block, I'll be telling you the number and name of the block we'll be making.  I'll also be posting a picture of the finished block showing the color choices I used for my blocks.  In some cases I changed it up a bit!

If you don't have one of these, you'll need it for the Block of the Week project.
If you don't have one and aren't doing the BOW project, you still may want one!
I use mine a lot.

You can click the button below to go to our website and get one!

Happy Quilting!!

Wednesday, June 10, 2015

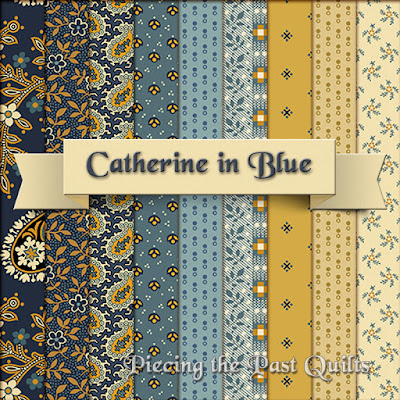
Jo Morton's "Catherine"!

It's June!  That means Jo's new line, "Catherine" will be arriving at the end of the month, or maybe beginning of July.  I am loving what I'm seeing here!

 Catherine Blue Colorway

 Catherine Brown Colorway

We decided to stock the blue and brown colorways, and maybe a few from the green.  The blue and brown are really speaking to me!

I'm looking forward to using the neutral shirtings in my next project.  I think I may like them as well as those from her Leesburg line, and that's saying something!


Leesburg Line:


I'm looking forward to seeing what you make with them, too!

Happy Quilting!

Saturday, June 6, 2015

Quilt Label Pens

UPDATE: Unfortunately, this pen has been discontinued by Pentel.
I have ordered in a number of them, so will have them in stock for awhile anyway.
I'll be looking for a suitable replacement!

* * * * * * * * *

I have been on the hunt for a good pen for writing my quilt labels.  I've tried several and have been disappointed with all of them in one way or another.  They've either faded when washed or skipped when writing, or the line hasn't been the right width.

When I finished my last quilt, and pulled out all those pens (and there were a lot of them!), I was motivated to do a Google search to see what pens have worked well for other quilters.

I came across a blogger that had done a comparison on a number of pens, and her conclusion was that the Pentel Gel Roller for Fabric met the majority of her criteria.


Pentel Gel Roller Pen for Fabric


I got one, used it, and I have to agree with her.  It has been great!

The ink is permanent, waterproof, and acid-free.  It doesn't smudge or smear and withstands repeated washings.  It has a 1 mm tip, which may seem a bit big for small labels, but I've found that if I don't bear down too hard, the line width is fine.  It also writes smoother if I don't press too hard.  

If you'd like to read the blog post about the pen comparison, you'll find it here:

Which pen to use?

If you end up buying one, make sure it's the one for Fabric!

Happy Quilting!